Saturday, December 29, 2012

White Bean, Olive, Tomato Bruschetta


We just spent some glorious time in Bend, Oregon visiting my cousins and skiing at Mt. Bachelor!  It was a car trip so I was able to pack bags and bags of things to take with us.  I brought a bag with the Vitamix and all the important things that go into a smoothie like ground flax, chia, Vitamineral Green, bananas, etc.  I packed the cooler with Romaine and chopped kale. We had nuts, peanut butter, bread, crackers, oranges, apples, carrots, hummus, avocado, stuff for vegan tostados, etc.  I think I must have starved in a past life.  We can't even go more than 50 miles in our car without me packing food.  It's a bit of a compulsion!
 
Even though I brought all the basics for us to eat,  my cousins provided amazing food for us!  The house we were staying at made us spinach pasta with homemade pasta sauce and an amazing quinoa bowl dinner where we were able to layer all sorts of yummy vegetables, beans, and salsa into a bowl on top of the quinoa (the thing that impressed me most was a 20 year old made this for us!)
 
Another cousin in Bend fed us a feast of Ratatouille served over brown rice, a beautiful romaine and avocado salad, and the most amazing delicious white bean,olive,tomato, basil bruschetta!  The topping was pretty fabulous on the little bread toasts but really, I could have just spooned the stuff straight into my mouth!  This dinner came after our first day of skiing and we were ready to eat! I have such gratitude for all the effort that went into preparing this meal and all the thought that my cousins put into making us great vegetarian food during our visit!
 

I got home and vowed to make the spread but I lost the little piece of paper that my cousin gave me with the recipe - damn! I did some online research and found a recipe on Epicurious that was close enough and then tweaked it a bit.


 I used a can of white navy beans, 2 large tomatoes, chopped garlic, chopped olives, chopped basil, olive oil, and salt and pepper.  (If you are one of those "season" police and disagree with me using things like tomatoes and basil in the winter... I am so sorry, really, but this is so delicious I just had to make it!)

White Bean,Olive,Tomato and Basil Bruschetta
 
1 can of white navy beans or 1 1/2 cups cooked white beans
2 large tomatoes (2 or more cups) chopped
1/3 cup chopped olives (Kalamata and some big green olives)
1/4 cup chopped fresh basil
1 tablespoon minced fresh garlic
4 tablespoons olive oil
salt and pepper to taste
 
Put it all in a bowl and stir gently.  I let it sit just a bit to "marry" the flavors before serving.
 
I did not spread olive oil on the little sliced baguette pieces and bake them prior to piling the above on the bread. We just sliced a baguette and went to town! This uses a bunch more olive oil and I was really worried about using 4 tablespoons of oil in one recipe as it was!  Oil is over 200 calories per tablespoon and I believe it should be used somewhat sparingly.  I like to eat my fat in nuts, avocado, and seeds.  In fact, I think one could easily use 3 tablespoons or less of the olive oil in the spread.


Here is the bowl of deliciousness!  We spread it on little bread rounds.  I can imagine topping a big Romaine salad with this, having it next to pasta... eating it out of the bowl with a spoon!  You just can't go wrong.  I eat a plant based diet and beans are a really important part of that diet (for me).  I try to eat beans every single day.  This is a really yummy way to do that! We served the bruschetta last night with pasta, roasted tomato sauce, roasted cabbage, and steamed carrots and chard.  It was delicious.
 
I did not include the photo of me holding the little brushcetta before pushing it into my mouth because frankly, my hand looked like crap --- you could see the blood blister and callouses from my efforts to perfect a pull up and it was not appetizing!  You will have to imagine how good this looked on a little round piece of baguette. 
 
And finally.... I have to share with you my Xmas gift from the daughter!  Aren't these darling?  I am almost afraid to use them because they are so cute.  I really needed a new pair. The ones I have been using are in awful shape.  Thanks, Daughter!


Thursday, December 20, 2012

Homemade "Cherry Pie Larabar"


This is not a Larabar.
 
 
This is the beautiful tree I get to see every time I drive home.  I just had to stop and snap a photo and share.  This photo, by the way, does not do this fabulous tree justice!  The colors are just spectacular.

After our last California vote in November when Prop 37, the GMO food labeling initiative, was not passed I did some online research.  I decided to start voting even more with my dollar.  I vowed not to buy from companies who supported the defeat of this proposition - a proposition I find to be terribly important.  Unfortunately, "Larabar" was one of those companies.  I don't eat a lot of "energy" bars but I do always carry a Larabar in my car or purse for emergency carb loading and I do use a Larabar for everyday calorie and protein loading when I backpack.  I ate one every single day we were in the Himalaya's trekking a few years ago. They would serve me my oatmeal and coffee or tea and I would add a Larabar.  My favorite flavor of all time is the "Cherry Pie"

I've done a little more online research and found some amazingly simple recipes for homemade Larabar's.  The thing I've always appreciated about Larabar's is that the main ingredients are few - nuts and dried fruit.  No additives, no added sugar, no chemicals. 

I decided to try my hand at my version of a "Cherry Pie" energy bar.

 
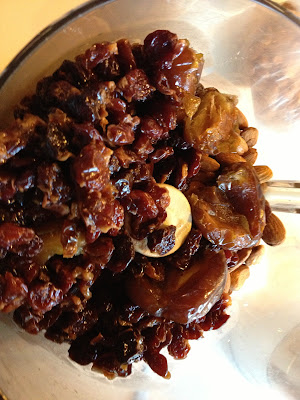
The above photo is all the ingredients in the Cuisinart ready to be ground together.

Here's the recipe I muddled together using online sources and my own creative notions.

Cherry Pie Raw Energy Bar
 
2 cups raw organic almonds
2 cups unsweetened dried organic cherries
5 organic dates (pitted)
1/2 tsp cinnamon
1/2 tsp to 1 tsp vanilla
pinch of salt
 
1.  Soak the cherries and dates in warm water for at least 10 minutes.
2.  While the dried fruit is soaking put the almonds, cinnamon, vanilla, and salt into the Cuisinart.
3.  Take the pits out of the dates, take the fruit out of the warm water and add it to the nuts and other bits in the Cuisinart.
4.  Begin to process.  At a certain point I had to take the lid off and stir, move the mass around and start the food processor again.  I did a lot of moving the mass around and then pushing the pulse button.  I also added 2 tbsp of the reserved dried fruit soaking water. This may have made the bars a tad bit gooier than they are supposed to be?  Not sure I'll add the water next time.  Maybe I'll just be more patient and stir more often and pulse over and over?


My gooey mess didn't grind to quite the smooth consistency I wanted, but after breaking my favorite baking spatula....
 
 
I decided to just go with what I had.
 
I pressed the mess into a medium sized baking pan with parchment paper on top to help me even it out. I put it in the frig for a bit to harden up. I had them in the frig for about 20 - 30 minutes.  I think the bars could use a little longer.  They are kind of sticky and much moister than the packaged kind.  That kind of makes sense, though, since they are incredibly fresh and haven't sat on a shelf in the grocery store.


Here is the finished product.  You can see the tiny chunks of fresh almond.  The cherries and dates are holding them together.  I wrapped them in plastic wrap and am storing in the frig.  I have read that you can freeze them for up to a month. 
 
I plan on making these for any road trips, travels to foreign countries where I know eating is going to be challenging, post work out carb and protein load, and backpacking.  I think they will make great gifts, too, for all my healthy work out friends!
 
I can't wait to make these and share them with my weight management students at Cabrillo College next semester.

Sunday, December 16, 2012

Raw Kale Salad with Creamy Tahini Dressing

Eat more kale!!!

My home garden is at an "in between" stage for kale. I have tons and tons of kale plants but they are either worn out, kind of picked over, or baby plants hoping for enough rain and light.  I found myself buying 3 huge bunches of kale at the Farmer's Market on Wednesday.  I bought a big bunch of dino kale which I juiced and two big bunches of curly kale.  One of the bunches was this spectacular purple red colored kale.  I figure things just have to be really really really good for you when they are that kind of vibrant color.

I took a photo of the purple red kale but this photo does not do the poor thing any justice!
 
I am a fan of raw kale salads but I seldom make them.  I'm committing to making more of them and here's how I started... with a creamy tahini dressing topped kale salad.  I looked online and in a few cookbooks and decided to put my recipe together in the following way:
 
Creamy Tahini Dressing
1/2 - 3/4 cup water
1/2 cup tahini
2 tablespoons flax seed oil
2 cloves garlic
Juice of 1 1/2 lemons
salt
pepper
 
I blended all of these together in my vitamix and got a frothy yummy garlicky creamy dressing.
 
For the kale salad I used:
 
2 heads of curly kale washed and torn into bite sized pieces
4 - 6 carrots shredded
1 red bell pepper sliced thinly
1 cup of pomegranate seeds
a couple handfuls of hemp seed


The difference between these two bowls is that one has only shredded carrot and one has the sliced bell pepper.

Steps for putting this all together:

1.  Wash and rip the kale and spin it dry
2.  Make the dressing
3.  Add the dressing to the kale.  Spend a couple minutes massaging the dressing into the kale. See the photo below.  That's right... just dig your clean hands into that bowl and massage away!  I have to say that I didn't massage long enough and our kale was a little hearty tasting - lots of chewing.  Still delicious but chewy. Massage that kale!

4.  Add the shredded carrots, bell peppers, hemp seeds, pomegranate seeds and mix.  Cover and let sit for a bit before eating.

What I would do differently next time?

-----I might roast the garlic before I put it in the dressing because raw garlic can be intense

-----I might use the flax seed oil on the kale before adding the dressing.  Massage the flax oil and a bit of salt into the kale first so it breaks down better. I'd massage the heck out of the kale, too.  I really didn't do the massage job justice and the kale was awfully chewy.

-----Add more lemon to the dressing.

-----Add avocado chunks to the salad when serving.

-----Add the hemp seed into the dressing.


Remember.... EAT MORE KALE!!  It's so good for you.


Sunday, December 9, 2012

Creamy Broccoli Soup and Beans, Greens, and Grain

Before I begin to write about the soup and bean dish I made, can I just share with you these amazing little bowls????  Aren't they the cutest little things you've ever seen?


There are actually 6 colors of these bowls at the store but I held myself back and bought only 4.  I think I may have to go back and get the last two colors!  I will drink chai out of these, eat soup out of these, serve dips and olives out of these and gee whiz I can just look at them and smile!  I need a 12 step program for bowl hoarders.  I love bowls and can't help myself from buying them. 

OK, the soup.....  I attended a vegan cookie exchange party last weekend and my friend, Amey (veganeatsandtreats.blogspot.com/) made this really delicious creamy broccoli soup for us.  I am not a huge fan of broccoli (give me a break, ok, I eat tons of kale and I will eat broccoli when it is served to me or I make it for my husband) but I loved this soup.  It was so warming and delicious.  She served it with a yellow bell pepper "creme".  I begged for the recipe and she gave me the link to this soup.  It came from what looks to be the PETA web site.  I was really excited because this means I can eat pounds and pounds of broccoli now in soup form and I love soup .... soup goes in bowls and you know how I feel about bowls, right?


The soup has 3 pounds of broccoli in it!

 
And 3 - 4 cups of fresh spinach!

 
And you serve it with a bell pepper creme - I used fresh bell peppers that I roasted (see the last blog post) and the whole thing was easy peasy to make and oh so delicious to eat.
 
Creamy Broccoli Soup with Red Pepper Creme
 
For the soup:
2 tbsp canola oil
2 onions chopped
4 stalks of celery, chopped
3 lbs of broccoli, stems trimmed and coarsely chopped/florets cut into bite sized pieces
8 cups of vegetable broth or water
1 tsp sea salt, plus more for seasoning
fresh ground black pepper
3 or more cups of fresh spinach leaves
 
1.  Heat the oil in a large cooking pot and add onions and celery.  Saute for about 5 minutes or until onions are translucent.
 
2. Add the broccoli stems and all but 4 cups of the florets and saute until crisp tender - maybe 10 - 15 minutes.  Stir occasionally to mix it all together and get things off the bottom of the pan.
 
3.  Add the stock, salt, and pepper. Cover and simmer for about 20 minutes or until the stems are really tender.
 
4.  Stir in the spinach and then let sit for a bit until spinach is really wilty.
 
5.  Use a hand held immersion blender or carefully blend in batches until the soup is thick and creamy.
 
6.  Add the reserved broccoli florets and cook over medium high heat until the florets are crisp tender (I overcooked them and they are mushy - not as good as Amey's!)
 
For the pepper creme:
1 red bell pepper, roasted
1/4 cup raw cashews
2 tbsp soy milk
1 tbsp lemon juice
1/2 tsp sea salt
 
1.  Combine everything in a blender and blend until creamy smooth!
 
Ladle the soup into bowls and drizzle the red bell pepper creme on top.


With our soup, we ate a rice, beans, and greens dish topped with delicious Reed avocado from the Farmer's Market.


We eat a lot of beans - beans in soup, beans with rice, beans in tortillas, beans with sauteed vegetables.  I try to soak and cook beans every week so that we always have a pot in the frig waiting for eating.  I also freeze beans in quart baggies - usually 2 cups per baggy so that I have them on hand for easy access and I don't have to buy cans and cans of beans.
 
I found http://www.vegancoach.com/ and spent some time reading the blog.  She has a fantastic section on how to cook beans.  I took her advice and made the following concoction and our bean and grain dishes are now transformed.  I had this for dinner twice this week and brunch after a work out!
 
Beans, Greens, and Grain
 
1/2 cup grain of choice (cooked)
1 cup of beans of choice (cooked)
2 tbsp Bragg's Amino Acids
Water
2 tbsp tomato sauce
2 tbsp nutritional yeast
2 tbsp "seedalicious" (recipe to follow)
pinch of chili pepper
salt and pepper to taste
3 - 4 cups of greens (chard, kale, spinach, bok choy, beet greens, etc)
 
1.  Put the cooked grain and beans in a large saute pan with the Bragg's amino acids and a bit of water.  Heat thoroughly and stir once in awhile.
 
2.  Add the other ingredients without the greens and heat and stir.
 
3.  Add the greens on top, turn down the heat, cover with a lid and let the greens steam.
 
4.  Mix it all up and put it on a plate or in bowls and enjoy the heck out of it!
 
"Seedalicious"
2 tbsp flax seed
2 tbsp sunflower seed
2 tbsp pumpkin seed
2 tbsp sesame seed
2 tbsp nutritional yeast
 
Blend this all together.  Use this on top of salads, soups and stews, vegetables, beans, oatmeal, grains. Store in the refrigerator.


Here's the dinner - big bowl of creamy broccoli soup with a large side of beans, greens, and rice covered with avocado chunks.  I used very little added oil to any of the cooking.  The entire vat of soup has only 2 tbsp of oil and the bean dish has no oil.  The fat comes from whole foods like flax, nuts and seeds, and avocado - couldn't get your fat from better sources than that!

Thursday, December 6, 2012

Wednesday Night Dinner - Vegan Pizza and Salad


Wednesday's are Farmer's Market afternoons for me!  Sometimes I am lucky and my friend, Laurie (yes, that's right, another Laurie!) and I go to lunch after yoga class and then hit the Farmer's Market.  We came upon this display on Wednesday.  Look at the beautiful colors of the winter FM - all kinds of squash, baking pumpkins, weird broccoli, and apples.  Sooo pretty.  Just looking at it made me happy so I took a photo. (directions to Laurie's blog are http://laurieslittlekitchen.blogspot.com/)

When I got home from the market I had two overflowing bags filled with spinach, butternut squash, carrots, oranges, collard leaves, red bell peppers, avocados, 3 pounds of broccoli, grapes, pea pods, parsley, celery, lettuce, limes, bok choy, and other delicious vegetables.  The first thing I did was wash and prep the vegetables for fresh juice. Oh, and the second thing I did was take an entire bunch of bok choy out of Lilly's mouth - black dog strikes again and helps herself to produce out of my bag!  Silly bad dog.


Dino kale from our garden, apples from our trees, parsley, carrots, celery, and ginger!


I made a big jug of fresh juice.  My husband and I swear that we can feel the goodness of fresh juice flowing into our veins within seconds after drinking it.  I'm not sure what really happens but we both believe that the fresh juice we drink has something to do with our glowing good health! I try to make us fresh juice every other day.  It's a lot of cleaning vegetables, pressing the juice through the Green Star juicer and then cleaning everything up afterwards.  Well worth the time and energy.


The next thing I prepared was a vegan romesco sauce from Dreena Burton's cookbook, "Let Them Eat Vegan".  This was a repeat performance of the same recipe I made for a vegan potluck on Sunday.  The recipe follows the photo:
 
 
This romesco sauce uses toasted oats instead of bread.  It is delicious as a dip with bread and crackers.  I actually made it to be the base of our vegan pizza meal and I imagine it could be used on pasta or vegetables, as well.
 
Romesc-oat Sauce
makes about 1 1/2 cups
 
1/2 cup toasted oats
1 1/4 cups roasted red bell pepper (I typically use a bit more)
1 medium to large clove of garlic
1/2 cup toasted almonds
1/2 teaspoon salt
freshly ground black pepper to taste
1 1/2 tablespoons red wine vinegar
2 tablespoons olive oil
1/4 teaspoon smoked paprika
  2 - 4 tablespoons water
 
In a food processor, combine all ingredients starting with 2 tablespoons of water, and puree until smooth, adding more water as desired.
 
Toast the oats and almonds in an oven heated to 425degrees for 5 - 7 minutes.  Watch them carefully and toss them once or twice.  I ended up burning my first attempt and almonds are not cheap!
 
 
This photo is crazy and looks upside down.  Not sure what happened but please don't get dizzy looking at it, it's just the oats and almonds on the baking sheet!
 
I bought a bunch of red bell peppers at the Farmer's Market  so I could roast them at home, use them for this sauce, and then freeze the rest for use over the winter months.


I always wash my bell peppers with vegetable wash and then rinse them very very well.
 
 
I placed the bell peppers on a baking sheet lined with parchment paper and put them in the oven to roast at 450degrees.  I turned them once during the process.  I am not sure how long it took but I watched them carefully and took them out when they began to blacken.


I let them sit in their own blackened goodness for about 20 minutes and then rinsed them under cold running water to remove the skin and seeds.


What I didn't use for the sauce I put on lined baking sheets and froze overnight.  Stack the  flattened frozen roasted bell peppers in a gallon size plastic bag and store in the freezer for future use.

I used the romesc-oat sauce in place of tomato sauce on the pizza.  It was delicious!  Here is a photo of our whole wheat crust romesco sauce, spinach, green olive and fake pepperoni pizza.  Yum.


Here is my dinner plate.  We really had a salad dinner with a side of pizza.  Our salad consisted of baby lettuces from my fall/winter garden, carrots, cucumber, jicama, fresh pea pods, sunflower seeds, sprouts and an amazing avocado from the FM. (check out the photo of the avo near the end of the blog)  I dress our dinner salads with flax seed oil, balsamic vinegar, nutritional yeast, salt, pepper, and usually one flavored salt.  We eat a big green salad for dinner at least 4 times a week - maybe more.


And here's the prize winning Reed avocado.  OMG!  This was the most delicious smooth avo.  I used most of the second half on my rice and bean brunch today.  Do not fear the fat in avocado... it is sooooo good for you.

 
I ran into someone at the Farmer's Market who asked me whether I felt like I could "recover" from the weight training and metabolic work outs I participate in regularly.  He asked whether my body could recover without "primary" protein.  I took this to mean animal products.  I explained that I had not eaten meat for over 25 years and had been eating an almost 100% plant based diet for nearly 2.  He asked me if I didn't miss eating animal foods in my diet.  I explained that I eat mainly vegetables, fruit, grains, nuts and seeds.  There is tons of protein in what I eat and my body is nourished with multitudes of phytonutrients on a daily basis.  My body is fueled beautifully by my daily intake of flax seed, chia seed, almonds, cashews, walnuts, sunflower seeds, berries, beans, rice, quinoa, whole wheat bread, tons and tons of green vegetables, fruit, kale, kale, kale, kale, and the rest.  It is a complete myth that these foods do not contain protein.  I have never felt better in my life.  He said, "You've got this dialed in."  I think that's a great way to think about it.  Yes, I've got this dialed in. I'm learning not to roll my eyes when folks ask me about protein.  Instead I explain patiently how it works for me and I am really happy for what works for each of you, too!